| |
Chapter 3: Using X-ed - Briefings
It is generally considered rule of thumb that you finish your
mission before doing the mission’s briefing. In X-ED, it’s
not just a rule of thumb; it also serves a purpose besides
knowing for sure how your mission is going to turn out.
Traditionally, briefings are the hardest part for new mission
makers to learn, and while they are now *much* easier to make
(having been someone who used to make TIE briefings on BSL),
people still are intimidated by them. Fortunetly, X-ED makes
the process very simple, and is the easiest program to build
briefings for.
Briefings in X-Wing work similarly to other platforms in that
you have a map with text and flight groups and tags. It’s
different in that it has multiple pages; usually the first
page being the map, with additional pages that simply consist
of text. You also have the option of making a hint page, but
we’ll get to that later.
Press the briefing button, and a new window will pop up with
many new options. In the upper left corner will be the familiar
new file/open file/save file/save as task bar that you should
be accustomed to by now. However, in the upper right corner
are numerous new options special to the briefing window. Before
we get to those, let’s discuss the 4 tabs you’ll be using
in this window.
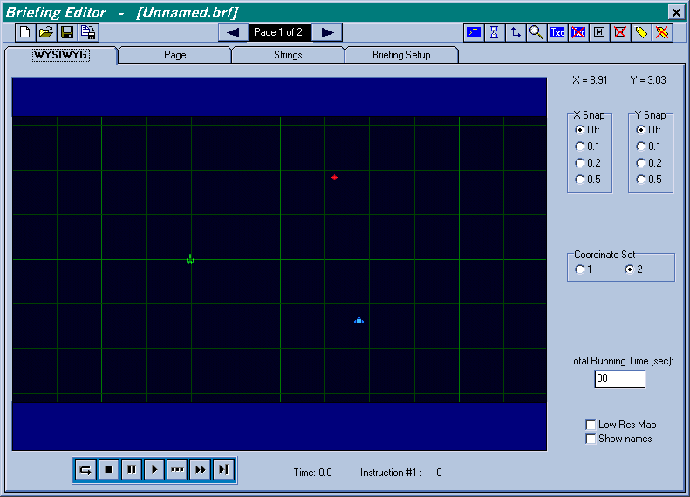
WYSIWYG tab (What You See Is What You Get)

This tab displays the most important screen, as it works mostly
as a demonstration of what your briefing will look like in
X-Wing. You can play your briefing simply by pressing the
play button, and then rewind and pause at your will. You should
also note the box to the right where you insert the length
of time of the briefing. There is also a button at the top
to switch between the various pages, although the map page
(should be the first page) will be the one primarily viewed
in this tab. You can also move around Flight Group icons and
Mag Tags in this tab when viewing the map. It is also on this
map where you will want to use the following buttons
 Move Map – This button will
allow you to move the map around to any area you wish. It’s
best to use it in the WYSISWYG tab as you can physically move
the x and y axis so that the map is exactly where you want,
but you can manually insert the x and y axis numbers as well.
While usually you do this at the beginning of the briefing
to set up how you want the map to be, if you want the map
to move during the briefing, all you need to do is play the
mission up until the part where you want the map to move,
pause it, use the move map button to move the map where you
want, and hit done and then play. The map will now move where
you have specified such change to happen, and you can always
revise or fine tune this change in the page tab, which we’ll
get to in a second. Move Map – This button will
allow you to move the map around to any area you wish. It’s
best to use it in the WYSISWYG tab as you can physically move
the x and y axis so that the map is exactly where you want,
but you can manually insert the x and y axis numbers as well.
While usually you do this at the beginning of the briefing
to set up how you want the map to be, if you want the map
to move during the briefing, all you need to do is play the
mission up until the part where you want the map to move,
pause it, use the move map button to move the map where you
want, and hit done and then play. The map will now move where
you have specified such change to happen, and you can always
revise or fine tune this change in the page tab, which we’ll
get to in a second.
 Zoom Map – This button allows
you to zoom in and zoom out the map. Like the Move Map button,
you can pause and zoom in or out around during the briefing,
but most times you’ll do it before hand. Zoom Map – This button allows
you to zoom in and zoom out the map. Like the Move Map button,
you can pause and zoom in or out around during the briefing,
but most times you’ll do it before hand.
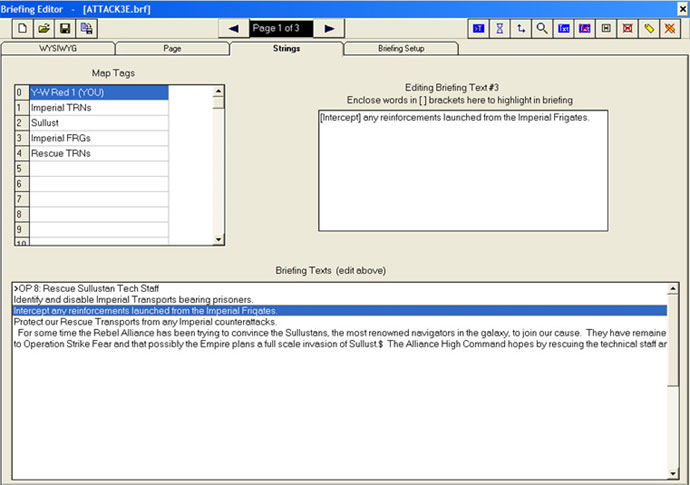
Strings Tab

Skipping over the page tab for a moment, the strings tab is
simply used to create your strings, or for the computer illiterate,
the text. You will write your map tags (things like the words
A-W Red 1 (YOU) and ISD Dominance that flash across the briefing
map) as well as the briefing text for both the lower section
of your map briefing and the additional pages of text briefing.
To edit the map tags, simply click on one line in the top
right box used for map tags, and write. For briefing text,
choose a line from the lower briefing text box and then write
out the string in the briefing text editing box in the upper
right. Traditionally, your first briefing line should be the
title of the mission.
In X-Wing, you must use a “>” mark to indicate that this
string is the title string and so it should be yellow and
bold. So, if your mission was called “Locke’s Trap”, you’d
want your first string to be “>Locke’s Trap”.
You can also highlight words by using the parentheses [ (to
begin a highlighted statement and ] (to end it). Be careful
about writing too much for the map briefing text strings,
as X-ED is only programmed to stop you when you go over the
limit for the blue screens, not the map briefing text screens.
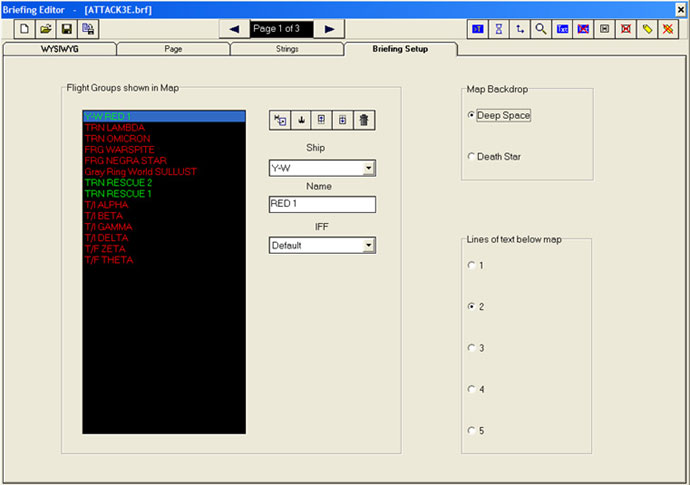
Briefing Setup Tab

This is probably the tab you will use the least, if ever.
This tab primarily designates the flight groups that are on
your map. Here’s where having your mission completed comes
in handy; all of the FGs from your mission are automatically
listed. While you may need to delete some groups, most of
the time you don’t have to worry about creating new FGs for
your briefing. If you desire to have the map not be a direct
representation of your mission and thus need FGs that don’t
appear, you can do so easily by simply clicking the add group
button and naming it in the corresponding fields, a process
which should not be difficult for you as it uses the same
buttons that you have in the mission editor for the same function.
One handy thing about the briefing setup tab is that you can
increase the space the text gets in your map briefing, from
1 lines to 5 lines, although 2 is the default (and I encourage
you to only use 3 if you have to, and to never really go above
that). You can also choose whether or not this is a Death
Star mission, although that is a function you should never
really have to use.
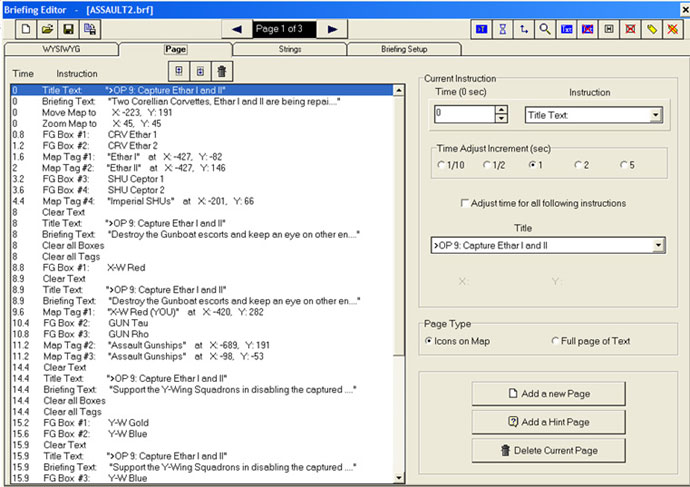
Page Tab

This is where the bulk of your work on your mission will be
done. This is also where you will use those buttons in the
top right corner we’ve only talked briefly about, so let me
explain what function each one serves.
 Title Text – this button
displays your title text. You will want to make sure there
is new title text after every “Clear text” command so that
your title never disappears. If your title text is your first
briefing string then you will only have to press the button,
but if not, you can change what string is the title text in
the pull down menu on the right side. Title Text – this button
displays your title text. You will want to make sure there
is new title text after every “Clear text” command so that
your title never disappears. If your title text is your first
briefing string then you will only have to press the button,
but if not, you can change what string is the title text in
the pull down menu on the right side.
 Briefing Text – This string
displays your briefing text. You designate which string of
briefing text it shows by designating the string of your choose
in the pull down menu on the right. Briefing Text – This string
displays your briefing text. You designate which string of
briefing text it shows by designating the string of your choose
in the pull down menu on the right.
 Clear Text – You will want
to use this command before displaying new briefing text. Make
sure that it is before (above) your new title text and briefing
text command, while still occurring at the same second, so
that you won’t get a period of “blank map”. Clear Text – You will want
to use this command before displaying new briefing text. Make
sure that it is before (above) your new title text and briefing
text command, while still occurring at the same second, so
that you won’t get a period of “blank map”.
 Flight Group Box – This will
create a box around the FG of your choice. You can choose
the FG you want to be boxed in the pull down menu on the right.
Be warned: This button automatically does the command Flight
Group Box #1 every time. If you want multiple boxes on screen
at the same time, you will have to use the scroll down menu
in the upper right to manually change the command to Flight
Group Box #2, Flight Group Box #3 or Flight Group Box #4 (in
X-Wing you can only have 4 boxes on screen at a time. If you
have multiple “Flight Group Box #1”s, only the most recent
one will appear. Flight Group Box – This will
create a box around the FG of your choice. You can choose
the FG you want to be boxed in the pull down menu on the right.
Be warned: This button automatically does the command Flight
Group Box #1 every time. If you want multiple boxes on screen
at the same time, you will have to use the scroll down menu
in the upper right to manually change the command to Flight
Group Box #2, Flight Group Box #3 or Flight Group Box #4 (in
X-Wing you can only have 4 boxes on screen at a time. If you
have multiple “Flight Group Box #1”s, only the most recent
one will appear.
 Clear Flight Group Boxes
– This will clear all FG boxes on screen. Use before you start
making new FGs similarly to how you use Clear Briefing Text. Clear Flight Group Boxes
– This will clear all FG boxes on screen. Use before you start
making new FGs similarly to how you use Clear Briefing Text.
 Map Tags – This button creates
map tags. You choose the map tag you wish from the pull down
menu on the right, as usual. Like FG boxes, you will have
to manually use the upper right pull down menu to change to
“Map Tag #2” and so on if you have multiple map tags on the
screen at the same time. While you can also set the coordinates
from this screen, you will probably just want to go to the
WYSIWYG tab and move them with your mouse yourself. Map Tags – This button creates
map tags. You choose the map tag you wish from the pull down
menu on the right, as usual. Like FG boxes, you will have
to manually use the upper right pull down menu to change to
“Map Tag #2” and so on if you have multiple map tags on the
screen at the same time. While you can also set the coordinates
from this screen, you will probably just want to go to the
WYSIWYG tab and move them with your mouse yourself.
 Clear Map Tags – This will
clear all map tags on the screen. Use the same way you use
Clear Flight Group Boxes. Clear Map Tags – This will
clear all map tags on the screen. Use the same way you use
Clear Flight Group Boxes.
 Wait – There is no reason
to ever use this command ever. It sets a part of the briefing
map to wait for a click. This is only usable for hint pages.
If you want a hint page, there is a button in the button right
that can create one. Never use this button. Wait – There is no reason
to ever use this command ever. It sets a part of the briefing
map to wait for a click. This is only usable for hint pages.
If you want a hint page, there is a button in the button right
that can create one. Never use this button.
You should also note that there is an up and down button in
the top, which can move briefing commands around similarly
to how you can move FGs around in the regular portion of the
X-ED mission editor. This will be useful in making sure your
Clear tags come before your new tags.
If you understand how each button works, then you shouldn’t
have much trouble in making the briefings. Use various commands
to set up a list of commands that will tell the briefing what
to do. The time box allows you to specify when each action
happens. Typically, each briefing text string should last
for about 6 seconds. Then, at second 6, simply use a clear
text command, followed by a title text command, followed by
a briefing text command with a new string. Repeat and add
map tags and fg boxes at your own whim.
Once you’re done with the map, change over to the next page
to set up the commands for the briefing pages. These are very
simple; all they need is a title text and a briefing text.
That’s it. You can add additional pages using the “Add a New
Page” button in the lower right corner. Above that, you can
also specify whether or not the page is a regular page of
text, or a map. You should generally only use one page of
map and then how many pages of text you desire, however. Multiple
maps aren’t really necessary.
If you are still confused, open up some X-Wing missions and
watch their briefings in X-ED, and then observe the commands,
and how they work. X-ED makes briefings very user-friendly
to learn and build, so you should be able to learn how to
make them without much difficulty, and already been way ahead
of the game for learning how to do briefings for TIE, XvT
and XWA in less-friendlier briefing environments.
.: Chapter 4: Testing :. |
|


